
In this tutorial you will learn how to toggle between two flashing LEDs, one will be off, the other on. This interesting code can be used for many other things as well.
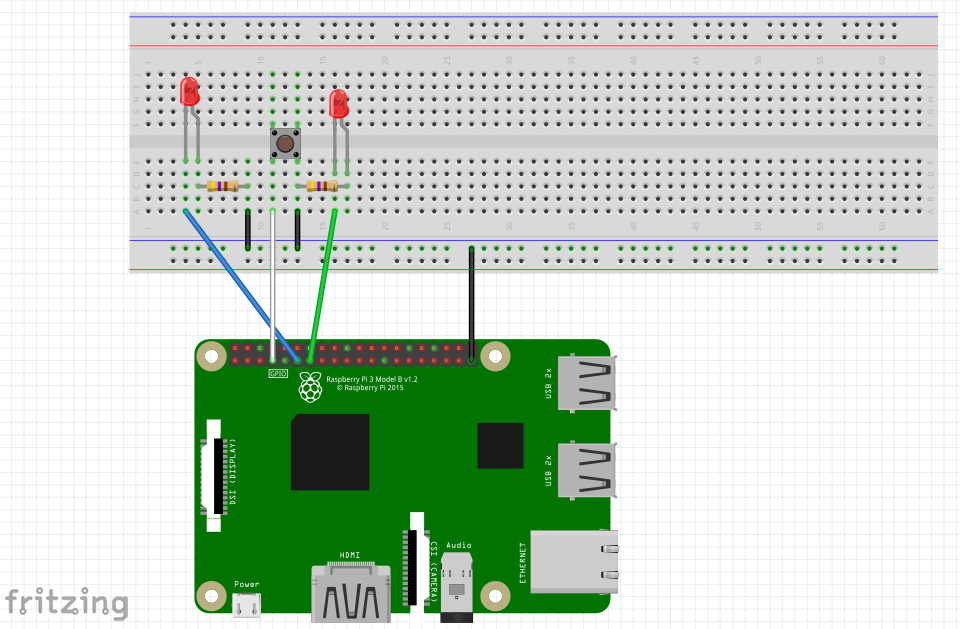
You'll need to wire up a button and some LEDs to a breadboard and connect them to the Raspberry Pi so that they can be controlled.
You can copy and paste the code from below into a python file on your raspberry pi or use the following command to download it from our Github:
$ - wget https://raw.githubusercontent.com/fraser148/pi-project-files/master/Toggle.py
#Pre-loaded-pi-sd.com

#This program will toggle an LED.

import RPi.GPIO as io

import time


io.setwarnings(False)


io.setmode(io.BCM)


LEDs = (17,27)

for LED in LEDs:

    io.setup(LED,io.OUT)

    io.output(LED,0)


button = 4

io.setup(button,io.IN,pull_up_down=io.PUD_UP)


time_delay = 0.25


OF = 0


def toggle(channel):

    global OF

    for LED in LEDs:

        io.output(LED,0)

    if OF == 0:

        OF = 1

    else:

        OF = 0

    return OF


io.add_event_detect(button, io.FALLING, bouncetime = 300)

io.add_event_callback(button, toggle)


while True:

    global OF

    io.output(LEDs[OF],1)

    time.sleep(time_delay)

    io.output(LEDs[OF],0)

    time.sleep(time_delay)
This tutorial builds on knowledge from the previous tutorial: Buttons
At the start, the libraries are imported, warnings turned off and the numbering set to BCM. Next, an array is initialised. Array values can be accessed via the array name and in brackets the position in the array
LEDs[0]
will give the value of 17. This allows us to set up all the pins quickly as we go into a "For loop". A for loop will repeat a set of instructions a specific amount of times. In this case it will repeat as many times as there are values in the array LEDs. The variable 'LED' represents each value in the array as it repeats. So for the first loop LED will be equal to 17 and the next loop it will be equal to 27. It won't loop again as there are no more values in the array.
The button pin is then set up as an input pin. This is explored in the button tutorial.
Next The On/Off variable is set to 0, I used OF. After that, a function is defined which we will come back to.
The next part is very helpful in many programs. It creates an event and what to do when it happens. In this case when the button is pressed:
io.add_event_detect(button, io.FALLING, bouncetime = 300)
the function 'toggle' from earlier will be executed.
This function has the purpose of swapping which LED is flashing. Firstly, a global variable is brought in. Normal variables cannot be used as we need the value of the variable to be passed back out. This can't be done with a local variable. Next, another for loop runs switching off all of the LEDs. An 'if command' asks the question 'is OF equal to 0?'. If it is, run the following command and if not, run the 'else' set of instructions. This changes the variable to either 1 or 0, toggling between them each time the button is pressed.
The main loop of the program uses a while loop to keep flashing the correct LED either LEDs[0] or LEDs[1]
This program can be used for many other things requiring a toggle between two things, just integrate the functions in and remember the button events.