
In this tutorial you will learn how to set up input and output GPIO pins using the RPi.GPIO library in python
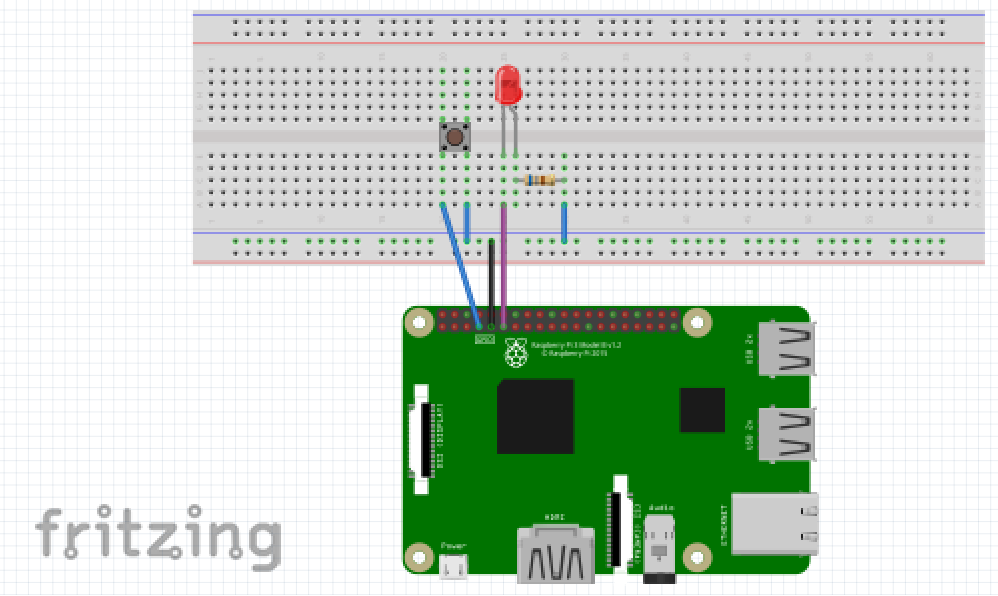
You'll need to wire up a button and an LED to a breadboard and connect them to the Raspberry Pi so that they can be controlled
You can copy and paste the code from below into a python file on you raspberry pi or use the following command to download it from our Github:
In this tutorial you will learn how to set up input and output GPIO pins using the RPi.GPIO library in python
You'll need to wire up a button and an LED to a breadboard and connect them to the Raspberry Pi so that they can be controlled
You can copy and paste the code from below into a python file on you raspberry pi or use the following command to download it from our Github:
$ - wget https://raw.githubusercontent.com/fraser148/pi-project-files/master/Button.py
#Pre-loaded-pi-sd.com

#This program switches on an LED for 0.5 seconds when a button is pulled to ground(0V)

import RPi.GPIO as io

import time


io.setmode(io.BCM)


button_pin = 4

LED = 17


io.setup(button_pin, io.IN, pull_up_down=io.PUD_UP)

io.setup(LED, io.OUT)


io.output(LED, 1)


while True:

    input_state = io.input(button_pin)

    if input_state == False:

        io.output(LED,1)

        print('Button Pressed')

        time.sleep(0.5)

        io.output(LED,0)
If you are completely new to python on the Raspberry Pi, this code has a few of the very basic and frequently used lines of code when doing physical computing with the Pi.
The start of the program is where libraries are imported into the program. Libraries contain functions which are pre-tested, pre-programmed sections of code that you can use to manipulate data. The
RPi.GPIO
library is always imported whenever you are using the GPIO pins of the pi and the
time
library is imported whenever you are using anything to do with time e.g. the
time.sleep()
function that will pause the program.
The pins on the Raspberry Pi are numbered on the board 1-40 but they are also numbered by the processor in the Pi(Broadcom). We have to choose one; either BCM(processor) or BOARD(Physical numbering). Here I have chosen the BCM:
io.setmode(io.BCM)
I used some variables to store the pin numbers in so that it is clear what pin goes where and so that if we want to change this at a later date, we only have to change the variable.
Next, the button pin was set up as an input pin. It's value was also pulled up.
io.setup(button_pin, io.IN, pull_up_down=io.PUD_UP)
This has to be done because when there is no voltage connected to an input pin it is regarded to be 'floating' so could range between 0V-3.3V. We have connected it to 3.3V internally by using the pull up parameter. This means that it will always be high except when it's connected to GND.
In the main loop, the code will repeat until the program is stopped.
while True:
. The code will constantly read the value of the input pin which will be True or False. When it's False, it is connected to GND which is when the button is pressed. The if statement asks the question if the button is False (connected to GND). When the button is pressed, the code after the if statement will run once. The LED will turn on using the
io.output(pin_number, 0 or 1)
command. 1 is on, 0 is off. The LED will switch on for the duration of the time delay set by the time_delay variable earlier in the code. It will then switch off and the whole loop will repeat.